Ever have this problem? Your Virtual Machines (VMs) created in Google’s Cloud Platform (GCP) and in “Compute Engine” (GCE) are dynamically assigned a public IP address by default but you want it to be static. The public IP address can change each time the host is booted/rebooted. However, you want to reference a host reliably, regardless of the public IP. GCP does offer a static IP solution, but this carries a fee for the entire time the IP address is reserved.
There’s a Better Solution
A hypothetical organization is leveraging GCE for application development and testing. All communication with the hosts is directly via an IP address. However, this change costs time and effort to update code and processes to access the newly assigned IP address.

Remote users access VMs directly using their public IP. However, in a dynamic environment, these hosts are constantly changing. This requires system owners to constantly update their code, and causes inefficiency.
GCP does allow static IP addresses to be reserved for individual VMs, but this can be costly:
- Static IP addresses are charged based on the time they are allocated.
- These costs accrue even if the assigned VM is powered down.
- The cost only increases with multiple reserved IPs.
Use the GCP Cloud DNS Service Instead
An organization with 1 managed DNS zone and 1,000,000 queries per month would only accrue $0.60 of billing per month. Meanwhile, an unused reserved IP address costs $7.20 (per reserved address) per month. Used address reservations cost slightly less at $2.88 (per reserved address) per month. So, an organization can be charged per static IP address, or use a managed zone that supports millions of records.
More on Google Network pricing here: https://cloud.google.com/vpc/network-pricing
If there is a managed DNS zone, then a record can be assigned to the VM within the Compute Engine. From this point, API calls can be used to update the DNS records as needed. In this way, hostnames are used to reference a system with a dynamic public IP address without the need to manually update the change the IP address each time. This is accomplished by setting a start-up script on the VM. It will download the DNS update script, and then set it to run each time the host reboots.
Cloud DNS is a very cost effective service. Many companies would prefer to leverage this solution over static IP addresses, which is more costly. An environment that leverages this solution would operate like this:
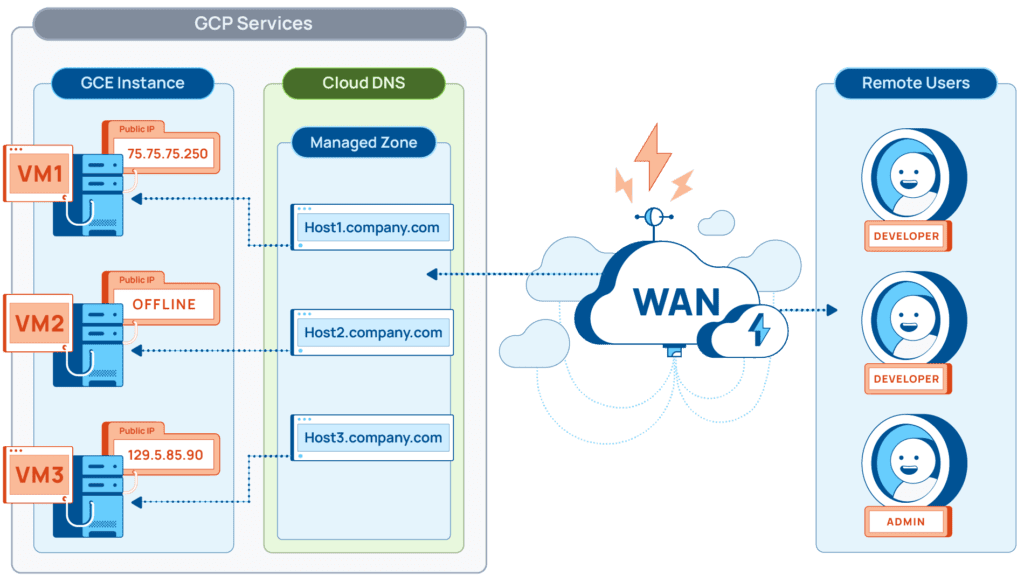
This solution allows all of the remote users to permanently point to a hostname located in their managed DNS zone. This hostname will dynamically updated each time an associated VM is create or rebooted.
Using Python and Google’s Cloud DNS API
Python is a flexible and intuitive scripting language that runs across many platforms. Libraries are publicly available to enable connectivity and management of your Google project. By configuring a corresponding service account within your project, you can safely and securely manage your DNS entries from a GCE instance. Therefore, automating tasks with Python within Google Cloud Platform is a smart choice.
Additional information on these libraries can be found here:
Implementation
Pre-requisites:
To leverage this script, the following services must be enabled within GCP:
- Compute Engine
- Cloud DNS
- A Managed Zone
- Associated APIs enabled.
- Cloud NAT (only required in cases where direct access to WAN resources is blocked)
- Root Access on the host VM.
- A service account with DNS Administrator Role
Enable Cloud DNS & APIs
GCP Cloud DNS must be your DNS provider for this to work. To enable this functionality on your domain, please follow the steps detailed at the link below:
https://cloud.google.com/dns/docs/quickstart
Next, ensure that you have the Cloud DNS API enabled:
https://cloud.google.com/apis/docs/getting-started
Configuring Your Service Account
You will need your VM instance to run with a service account that has rights to add/remove DNS records. For this example, we will give the service account the “DNS Administrator Role”. To do this, follow the steps below:
- Navigate to the “Service Accounts” area under “IAM and Admin”.

- Click the “Create Service Account” button at the top of the screen.

- Give your service account a unique name and click “Create and Continue”.

- On the next screen, filter for DNS and select the “DNS Administrator” role. Then click continue.

- Grant any required permissions to the user who will be administering the service account then click “Done”.

Configure Start-up Script in Compute Engine
We will be creating an Ubuntu 18 host in this case to run our script on. For this we will need to navigate to GCE and set up the new instance:
- First navigate to “Compute Engine”

- Now let’s select “Create Instance” at the top of the screen.

- From here give the host a unique name, and set the “Machine Type”. I recommend a “micro” or “small” VM for this exercise.
- Change the “Boot Disk” to Ubuntu 18.04. Leave everything else at default.

- Select your service account under “Identity and API access”.

- Expand your options on the bottom.

- Scroll down and find the “Management” dropdown and expand it.
- You will see an area called “Automation”. This is where you need to insert the start-up script below.
- The DNS update script runs on the host at start up. The purpose of the script is to ensure that all OS requirements and python libraries are installed prior to installation of the script:
The above script runs successfully on Ubuntu 18. These commands would need to be tweaked for other Linux flavors. The python script to update the DNS entry is noted below. This should run successfully on any OS so long as python3, and all required python libraries are present. The script below needs to be placed in a repository online. The URL for your repository should be referenced in the “curl” command contained within the “startup script” above.
This python script above does the following:
- Resolves the current host DNS entry to get the current IP address
- Connects to the GCP Cloud DNS API
- Removes the current host record
- Creates a new host record with the correct public IP
This solution can be easily implemented and can save your organization time and money. By creating a “Dyn-DNS” like solution, users can use a familiar hostname without having to keep up with dynamic IP addresses in your virtual infrastructure. It’s an elegant solution. It’s how Dito does it.
")
Matt Hampton
Sr. Cloud Security Architect
Information Technology Architect with eighteen years of experience consulting, advising, leading strategies, and initiatives to develop, maintain and govern the enterprise architecture across organizations. Information Technology is my passion and I work everyday to hone my craft. I am driven to succeed in all presented tasks. My education includes a Bachelor of Science in Network and Communication Management. Active certifications include CISSP, CCSP, CEH.
Recent Posts
On-Demand