There may be times when you need a little assistance managing your busy schedule. Maybe you are traveling somewhere for work, having to attend a lot of meetings, or just plain busy … another hand is never a bad thing.
With Google Calendar delegation, you can grant someone access to your calendar and give them the ability to add/edit events or you can give them view only rights. Let’s take a closer look at the steps necessary to make this happen.
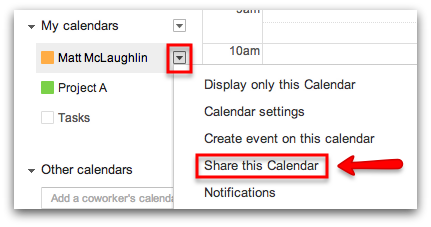
Open your Google Calendar and hover your mouse over your primary calendar. You’ll notice a drop down arrow that appears to the right of your name … click on that arrow and select ‘Share this Calendar.’
The next screen you will see is the ‘sharing’ page. Look towards the bottom of the page for the section titled ‘Share with Specific People.’ Here, you will enter the email address of the person that you wish to share your calendar with. To the right of where you enter the email address is where you will grant the person with ‘Permission Settings.’ The settings are…
- See only free/busy (hide details)
- This setting allows the user to ONLY view the calendars free/busy details. They will not see the actual event title or it’s specific details.
- See all event details
- If you provide the user with this permission, they will ONLY be able to view your calendar but the will be able to see the event title and the details that accompany the event.
- Make changes to events
- This setting will allow the user to make changes to your events as well as create events on this calendar. The user will have the option to put a calendar event on this calendar from the event details screen. They simply need to select the calendar they wish to put it on (yours).
- Make changes AND manage sharing*
- This setting does performs the same actions as the setting above with the added feature of providing the shared user the ability to share your calendar.
*If you select this setting for the shared user, the calendar will appear in their ‘My Calendars’ list … all of the other settings place the calendar in the users ‘Other Calendars’ list.
Now that you have entered the users email address and selected the permission setting, remember to click ‘Add Person’ & ‘Save’ at the bottom of the sharing settings page.

Clint now has access to this calendar and he will see it listed in his ‘Other Calendars’ list. When Clint needs to put a calendar event on your calendar or make any specific changes, he can simply click on the calendar event to make any changes and he can select which calendar to place the event on when creating a new calendar event.

If you decide that you do not want Clint to have access to your calendar any longer, simply hover your mouse over the delegated calendars name –> click on the drop down arrow –> select ‘Share this Calendar.’
Here, you can click on the trash can icon to remove the delegated person from the list.

Let us know if you will be delegating any calendars in the comments section below. Also, if you have any ideas or suggestions for future blog posts, let us know … your topic may be featured in an upcoming post! If you enjoyed this article and want others to benefit from this information, give this page a +1 to increase the visibility!
Recent Posts
On-Demand